Our brains like words. But they really love images.
The brain works in images. When we talk, our brains change the information we’re receiving into images to encode it and make it available for recall later.
A powerful way to take advantage of that is visual notetaking — recording ideas using both images and text. Some call it doodling, and many have gotten “in trouble” for doodling in class even though there were cognitive benefits of it over standard notetaking.
Brain benefits of visual notetaking
- It keeps the brain active. In a study, participants were able to recall more information if they were simply “doodling” (coloring in shapes in this exercise).
- It provides multiple entry points to the brain. Dual coding theory, according to this Education.com article, states that including visuals helps encode ideas in the brain through two routes: “a verbal code specialized for dealing with language in all its forms and a nonverbal code specialized for dealing with nonlinguistic objects and events in the form of mental images”
- It’s fun! Using this pleasurable way of taking notes can “generate a much-needed dopamine surge for pleasure, oxytocin surge due to love and trust that undergirds success, and a decrease in cortisol associated with stress.”
I’m a sketchnoting fanatic and have written several posts about it:
- Sketchnoting 101, for those with little artistic talent
- Sketchnoting in the classroom: 12 ways to get started
Google Apps + Visual notetaking
At a recent conference, I was chatting with fellow sketchnote enthusiast Carrie Baughcum. We were talking about some work her students were doing. What they were doing wasn’t official sketchnoting (free drawing images and text by hand), but she said …
I would consider that visual notetaking.
It was such a passing thought that she probably doesn’t even remember it, but it had an impact on me.
Because I really like the sketching side of visual notetaking, I didn’t even think of other forms of it. There are many ways to get the brain benefits of mixing visuals and text (the verbal and the visual).
Then it dawned on me — this could be done with my favorite of the Google Apps, Google Drawings.
Google Drawings visual notetaking.
The basics
What is Google Drawings? It’s part of Google Apps, and it’s kind of like a digital poster board or a digital sheet of paper. You can add text, shapes, line and images to Google Drawings. It’s simple and very visual. Find it by clicking the red “New” button in Google Drive, hovering over “More …” at the bottom and clicking on “Google Drawings.”
Why use Google Drawings to take notes? Letting students create visual notes in Google Drawings provides the brain benefits listed above. Plus, students can pull in Creative Commons-licensed images to help illustrate their notes.
How’s it different from other Google Apps for taking notes? Google Docs is great for taking very text-based notes. It’s more linear (i.e. writing text in straight lines). Google Drawings is very spatial (i.e. you can move items all over the page).
Can students do this with iPads? A Google Drawings app isn’t currently available for iPad. However, the Google Slides app is. Students can create visual notes in a one-slide Google Slides file and it will be almost exactly like Google Drawings.
Two examples
Here are a couple of examples of what it might look like …
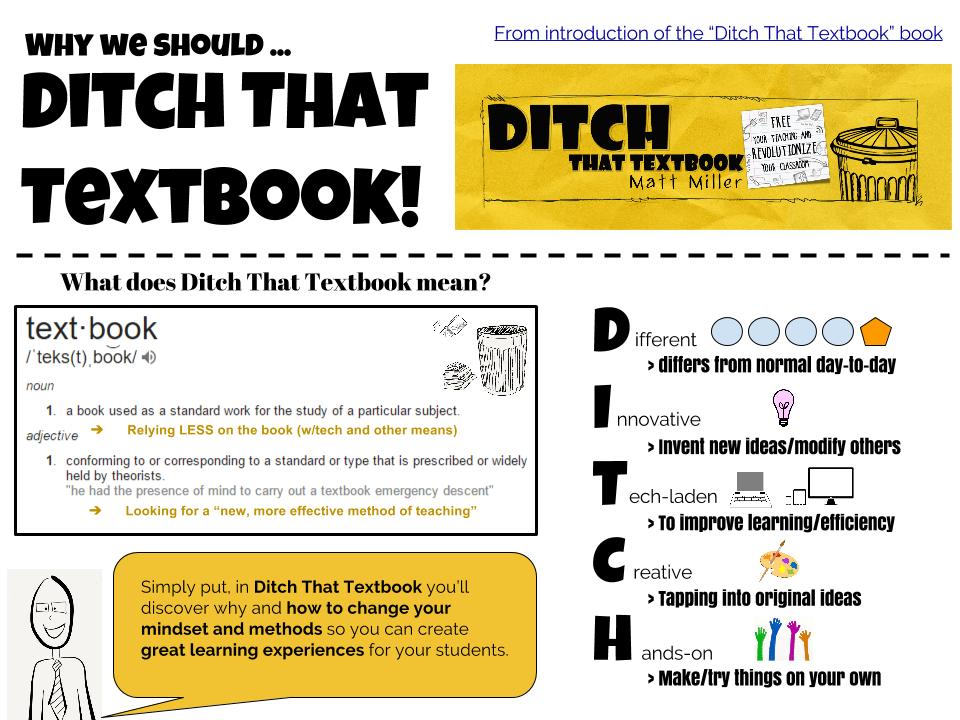
The first is a visual notes summary of the introduction of my book, “Ditch That Textbook”:
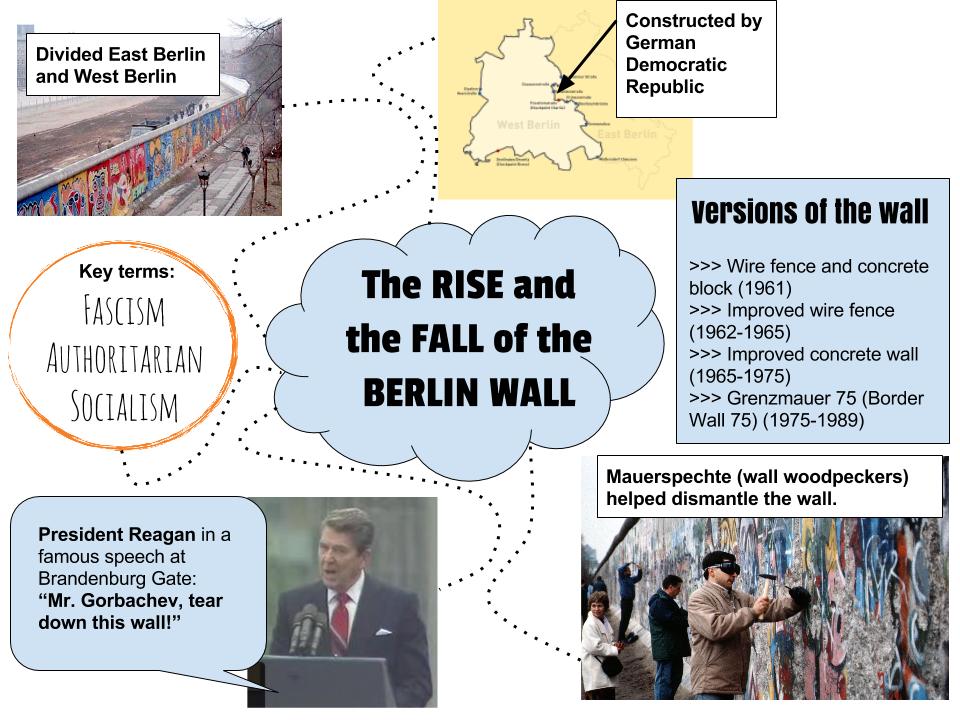
The second are visual notes I might create as a social studies student about the Berlin Wall:
(Note: Click on either image to open the Google Drawings file I created them in. Feel free to click “File > Make a copy …”, but please don’t send me requests to give you editing access. If you make your own copy of the file to your own Google Drive, it will be just as good as having editing access. Promise. 🙂 )
How to do it
Here are some features of Google Drawings you can use to create these visual notes:
- Images that students can use responsibly can be found by clicking “Insert > Image … > Search”. Students can annotate on those images (i.e. add text, circle important parts, underline with the line tool, etc.).
- Using the “Take a snapshot” option when inserting an image, students can use the camera embedded in their devices to snap their own pictures to add to visual notes.
- Use shapes to organize information (i.e. use a rectangle shape like I did for “Versions of the wall” above to set groups of facts apart from others).
- Lines can connect facts. Think of a semantic map/word web. I used those dotted lines to connect ideas in the Berlin Wall visual notes, but I probably didn’t need to. They would be more useful if the connections between ideas were more complex.
- Grab the bottom right corner of a Google Drawing and drag it to make the canvas bigger. If you’re running out of room, just make the canvas bigger and rearrange what you already have on it.
- App smashing (using multiple sites/apps/etc. to create a single product) works wonderfully here! I used some sketches I did in the Paper app by FiftyThree and pulled them into my book summary above.
- Use a screen capture shortcut Use Windows + Shift + S or ⌘ Cmd + Shift + 4 (mac) to take a screenshot of part of your screen. Visit take-a-screenshot.org for more shortcuts help you grab images and text from other sources. (Be careful, though … even screen captures of images still need to be used responsibly and in line with the rights of the creator.)
- Add links. Highlight text, images or even shapes and click the link button (or use Ctrl+K) to create a clickable link to take viewers to websites/videos/etc. with more information.
Sharing Google Drawings visual notes
These notes can be shared in a number of ways:
- Provide a link to let others view. Use the blue “Share” button and set sharing as “Anyone with the link can view”. When viewing this way, links can be clicked by the viewer.
- Download an image file to attach to a document, a slide presentation or something else. Click “File > Download as … > JPEG image”. Any links in the Drawing can not be clicked in a JPEG image.
- Download as a PDF file to email to others or attach to a website. Click “File > Download as … > PDF Document”. When viewing this way, links can be clicked by the viewer.
- Embed the notes in a website or in your class in certain learning management systems (like Canvas, Schoology, etc.). Click “File > Publish to the web …”. Click the blue “Publish” button and “OK.” Then copy the HTML code in the “embed” part of the window. Paste that HTML code in your website in a place where it says “embed” or “HTML”. Any links in the Drawing can not be clicked in an embedded Drawing on your website.
Another way of looking at it …
I wrote a post called “Google Drawings interactive posters: No glue sticks necessary!“. After creating the book introduction summary in Google Drawings, I started to realize that it was more like the interactive poster I described in that blog post and less like what I’d consider visual notes. (That’s really why I did the second example!)
Here’s the main point, I think …
Whether we’re thinking of these tasks as posters or notes, the more visual we can get with them, the stronger the links we’ll create in our brains.
And the beauty of these visual notes in Google Drawings is that any of us can create image-infused notes without needing a bit of artistic talent!
For notifications of new Ditch That Textbook content and helpful links:
Are you looking for quality, meaningful professional learning that both equips and inspires teachers?
Matt provides in-person and virtual keynotes, workshops and breakout sessions that equip, inspire and encourage teachers to create change in their classrooms. Teachers leave with loads of resources. They participate. They laugh. They see tech use and teaching in a new light. Click the link below to contact us and learn how you can bring Matt to your school or district!
Is Matt presenting near you soon? Check out his upcoming live events!


The link for this “It provides multiple entry points to the brain. Dual coding theory, according to this Education.com article, states that including visuals helps encode ideas in the brain through two routes: “a verbal code specialized for dealing with language in all its forms and a nonverbal code specialized for dealing with nonlinguistic objects and events in the form of mental images” – doesn’t work. What article are you linking to?
[…] Use Google Drawings for brain-friendly visual notetaking | Ditch That Textbook […]
OH MATT!! I am just in love with this piece. I feel like you have reached in part of my brain and captured so much of what I think about connecting words to visuals. The verbal-visual connection is such a powerful tool for learning! You are also, right, I don’t know that I remember the exact moment I said that phrase but I do remember such rich conversations and ideas about using drawing/doodling/images in the classroom and how open you were to the idea sharing and that there really are no rules as long as it is good for students and learning is happening. Oh man, I love this post! Really wonderful post, full of so much information, a wealth of ideas and most of all a really great idea for using Google Drawing and connecting images to ideas and information!!
I am going to have my level I Spanish students make a meaningful diagram of Ser vs. Estar using this. They will each have a Spanish-speaking country assigned to them. All of their examples have to be culturally relevant to their specific country. They will be listing and organizing the reasons for ser/estar and then using images from their countries and sample text sentences to illustrate the differences. I think they will enjoy the visual nature of this grammatical task plus being put in a cultural context, they should be discovering quite a bit about these countries.
Hi,
How is Google Drawings different from Paper 53? I learned about this from you at a conference. My students love it!
Hi Michelle — Several differences. Google Drawings is an app for Google that’s only available currently for browsers on computers (desktop, laptop, Chromebook, etc.). The Paper app by FiftyThree is an iPad app. Google Drawings uses text, images, shapes, lines and are controlled mainly by a mouse or touchpad on a computer. Paper is mainly hand-drawn (although you can incorporate images and text) through a finger or a stylus. Sharing is different too … Drawings through a link, a JPEG, a PDF, etc. … Paper through their Mix site as well as through PNG (image file). Those are some of the differences. Great question!