Slow internet is a way of life for many families. We can minimize internet limitations by using some of these tips.
It's a fact at my house. The internet is slow sometimes.
I live in very rural west central Indiana. We have two neighbors in a mile radius of our house.
The internet is OK but not fast. Too many video streams will bog it down. Uploading a video will cripple it.
Countless students all over the world are battling the same issue. When they're asked to do elearning from home, watching a simple video can take a long time, leading to wasted time and frustration.
Thankfully, we can take steps to help streamline work for these students.
In this post, we'll look at 10 ways to support students with slow internet, including:
How to make video calls easier to watch
1. Turn off the camera.
This is a simple step that really works. When you turn your camera off, your device doesn't have to upload live video to the video call. When others turn their cameras off, your device doesn't have to download their live video.
2. Encourage students to call in.
If students don't have internet -- or if their connection is slow -- a call-in option may be better. Most video call platforms (Zoom, Microsoft Teams, Google Meet) have an option to call in with a phone number. This can let students join if they (or their parents) have a phone but don't have lots of data to burn. It can also be a great alternative if their internet connection is slow (like mine).
3. Change the video resolution.
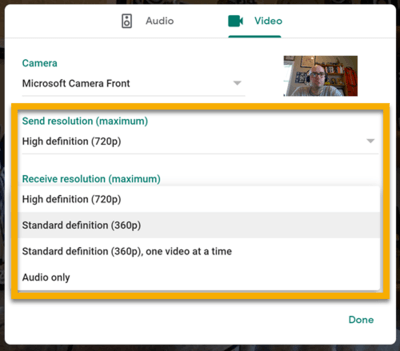
Some video call platforms will auto-adjust the resolution (video quality) to the user's internet bandwidth. Others will let you manually adjust it. In Google Meet, for example, by clicking on the three dots menu button and choosing the video tab, you can change the outgoing and incoming video resolution. (See below.) 720p is high definition and is harder on slow internet connections. 360p is standard definition and is easier on slow internet.
How to make video files easier to load
4. Record in lower resolution.
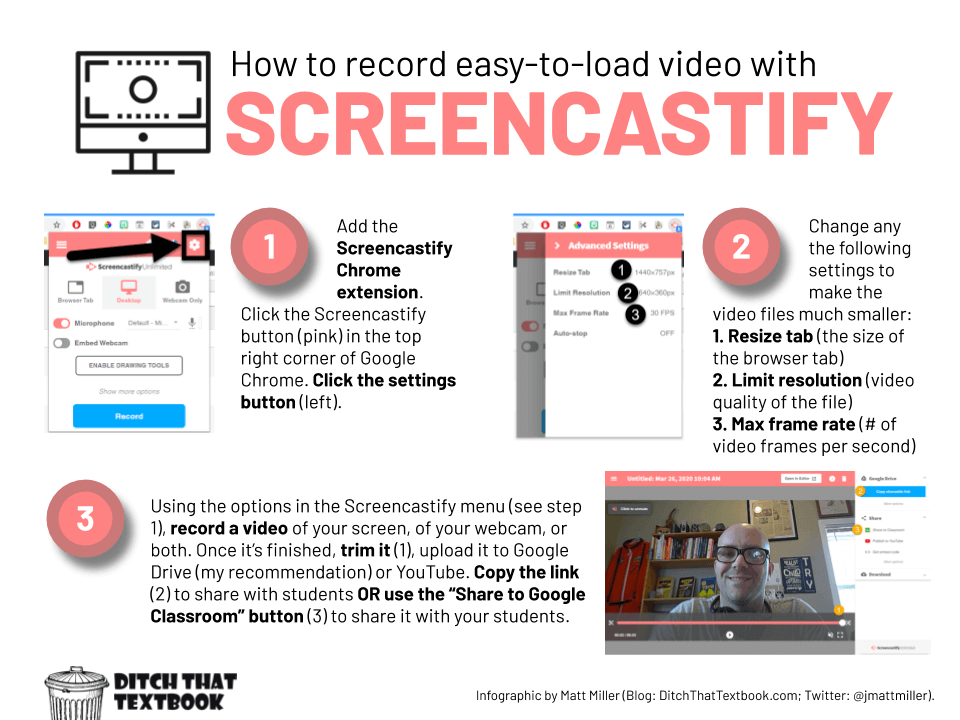
Lots of video recording apps -- including the camera on your phone -- default to creating video with very high resolution. If students have to load these videos via internet, it can cause long load times, lots of buffering, and headaches.
There are better options. Below, I'll show you how to record video with Screencastify (screencastify.com), an extension for Google Chrome browser.
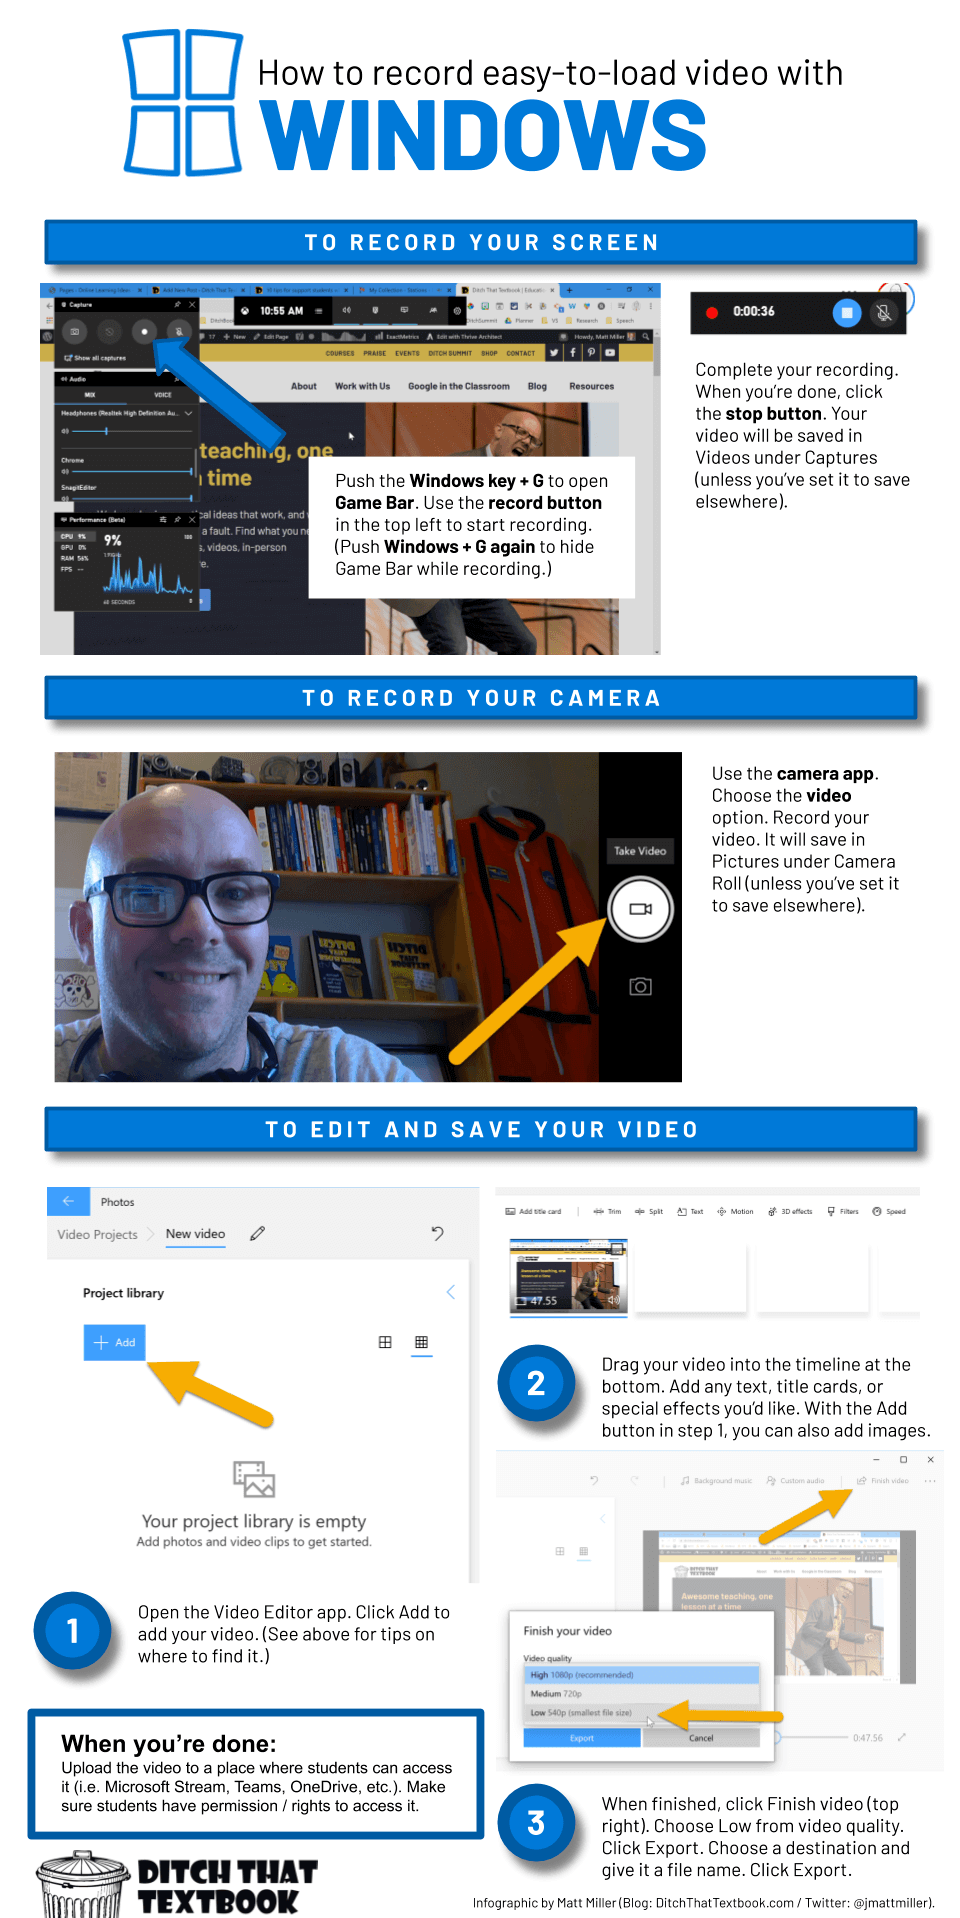
If you're using Microsoft Windows, all of the tools you'll need to create videos with low file size are already on your device! Here's how you can use the camera, Game Bar, and the video editor to create videos that students can load easily.
Other slow-internet-friendly options
5. Record audio.
Audio files are much smaller than video. If recording your voice is just as helpful as video, one of these options may be helpful:
- Use Vocaroo (vocaroo.com). Record an audio file in your web browser. Click save and either share the Vocaroo link with students or download the mp3 file and upload it to Google Drive or OneDrive, where you can share it with students. (Students can record and share audio this way, too.)
- Use a voice recorder app on your phone. Save it as an mp3 file and upload to Google Drive or OneDrive.
- Use Synth (gosynth.com), a voice conversation tool. Synth lets you and your students record audio to share with each other and reply in nested conversations. Here's a post about using Synth.
6. Use text. (Or text and images.)
Think about the reason you want to record video. If what you're describing can be communicated with text -- or text and images -- then you might consider avoiding video all together. Share information or instructions in text in an online document or in the description of your announcement/assignment in Google Classroom, Microsoft Teams, or your learning management system. If you need to demonstrate something and can do it with camera pictures or screenshots, insert those in the document with text. This isn't to say video is a bad idea, but if it's giving your students trouble and you can avoid it all together, this is an alternative.
7. Use images or infographics.
One of my favorite ways to communicate visually is through infographics. (Did you notice the ones above?) Lots of free tools will help you create them and save them as a single image file. I use Google Drawings, but you could also use PowerPoint (File > Save a copy > File type: .png or .jpeg > Save > Just this one), Canva, Piktochart, Adobe Spark Post or others.
Here's a post I wrote about creating infographics, and in this post, I share infographic tips with my downloadable "icon boards" infographics templates. (Feel free to use those, too.)
8. Create no-video web tutorials with Iorad.
Need to show students what to do step-by-step without a video? But you still want to do it visually?
Check out Iorad (iorad.com). It's an extension for the Google Chrome browser. Install it and click to start a new tutorial. Iorad will watch your screen and capture images as you work. When you're done, it will create a text-and-image-based tutorial for your students. You can edit everything it creates. Share it with a link. You an create these in a matter of seconds (minutes at the longest).
9. Create files offline.
Students don't need an Internet connection to create files on many devices. Once they're finished, they would only need an Internet connection to turn the files in.
With G Suite, students can create documents, slides, spreadsheets and more while offline. Here's a post I wrote with tips to make it happen.
With Microsoft Office, students can create files with the desktop apps while offline. They can also create files offline with Office mobile apps. Here's a support article with more details.
10. Provide files for students to use offline.
Create a template for students to use -- maybe a graphic organizer or a set of questions to guide their thinking. Students can download the file to use offline or, on many platforms, mark the file for offline use.
When they're finished, they can turn in their finished work through their learning management system (Google Classroom, Teams, Canvas, Schoology, etc.).


does this help with school
I was just given an F on an assignment because I am too poor for fast internet. All of my hard work is pointless and this punishing students from low income families.
[…] 10 Tips to support students with slow Internet – a really helpful post by Matt Miller on his fabulous “Ditch that Textbook” site with lots of practical ideas for making the use of video meets friendlier for everyone, whether slow Internet connection or super fast, including easy to follow visual how-to guides. […]
[…] Kate Martinkevich shared this post from Ditch That Textbook with 10 tips to support students with slow internet. […]
[…] 10 Tips to support students with slow Internet – a really helpful post by Matt Miller on his fabulous “Ditch that Textbook” site with lots of practical ideas for making the use of video meets friendlier for everyone, whether slow Internet connection or super fast, including easy to follow visual how-to guides. […]
[…] Miller from Ditch That Textbook wrote an interesting post about helping learners with poor Internet access. While a lot of the tips are geared at […]
Thank you, this post was super helpful to me learning how to upload videos to google classroom without bogging down my own internet. Screencastify is my new favorite tool!
Hate doing your work on your computer because it is so slow well I can help you whenever you need help.
did i ask
[…] slow-internet-tips […]
[…] Read the full story by Ditch That Textbook […]
Good stuff, Matt!
I have a detailed blog post about optimizing Chromebooks for offline or poor connections: https://www.chrmbook.com/no-wifi-2/
The post expands a bit on points #9 and #10.
Cheers!
Shared this blog with my online Humanities PLC team as we were just talking about this! Great stuff, love the infographics!