You come to the foot of a mountain and notice a cave. If you want to enter the cave, turn to page 56. If you want to continue up the mountain, turn to page 84.
I was in LOVE with Choose Your Own Adventure stories like this as a kid. In these books, the reader was confronted with several choices throughout the story, each leading to a different outcome.
 I loved choosing what the characters did and seeing the outcome. Then, when I finished one path through the story, I started the book over and chose different outcomes.
(Whenever I got dragged along to garage sales with my mom, I was always digging through tables and boxes of books on the lookout for CYOA books!)
These types of stories are fun to read.
They’re also fun to create … AND it’s fun to read your classmates’ creations!
How could I choice stories — and why?
That’s right … these creations don’t have to be your typical stories. Making these activities where you choose your own path can be used in all sorts of classes and content areas …
- History/social studies: Choosing new paths for historical figures
- Science: Showing outcomes for different choices in a lab
- Math: Giving some life to story problems (Math teacher Mandi Tolen writes about incorporating story in her math class with choice stories in this post)
- Family and consumer science: Show how a recipe could go right/wrong based on decisions
- PE: Show how choices in game strategy/fitness could go right or wrong
Digital citizenship. Executive function. Multiple choice questions with custom feedback. The list goes on and on.
If there are choices to make, the choice story is a fun activity to display them.
Plus, there’s a STEM/computer science connection! These stories make heavy use of “if/then” logic (also known as “conditional logic”). This is a key component of computational thinking and computer science. Just by exposing students to this part of the activity teaches them a valuable part of computational thinking.
Smart decision making. Computational thinking. Creating to learn.
You’re making a good choice to use this activity!
Is it hard to make choice stories? What would I use?
Are they hard to make? Not really … especially if you have a good plan (see below).
Will they take some time? Yes. This probably isn’t something your students can knock out in 20 minutes (unless they’ve gotten lots of practice with them).
What would you use? You can use Google Forms, and many teachers do. But I prefer Google Slides (or PowerPoint if you’re a Microsoft school).
Here’s my main reason: design flexibility.
Students can design their slides with more precision in Google Slides. And when they’re done, it makes for a better experience for students reading each other’s work.
Here’s a step-by-step plan for creating a choice story. Feel free to share a link to this article with your students so they’ll know what to do! (You can even put the link in their Google Classroom assignment.)
STEP 1: Plan
If students jump right on a new slide deck to start, chances are they’ll get overwhelmed and stuck.
Planning first is EVERYTHING.
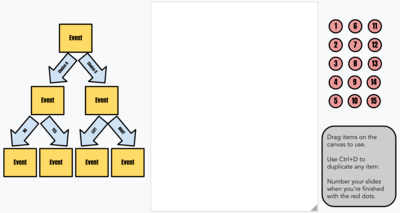
Write out a flowchart on a piece of paper — or, like I do in this post, a simple Google Drawing.
Click here to view/make a copy of this planning template you can share with your students.
- Click the link above to make your own copy of the template in your Google Drive.
- Attach the template to an assignment in Google Classroom.
- Choose the “Make a copy for each student” in the drop-down on the attachment.
To create my flowchart …
- I use boxes for the slides.
- I use arrows for the choices the reader will make.
- I use the red circles to number my slides. (This will be important later.)
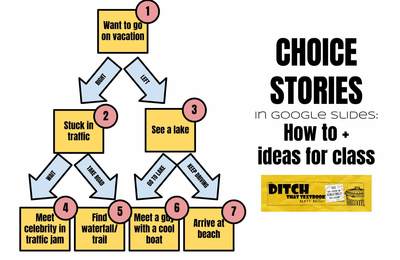
Here’s an example:

An example planning template for a choice story. Click image to see full-size.
I don’t have all the details on this workflow. That’s OK. You can get as detailed as you want on the slides. This is just to have a blueprint of how you’ll design the slides.
STEP 2: Create
It’s finally time to create a slide deck! Create a brand new Google Slides or PowerPoint to get started.
First: Each of the numbered boxes is a slide. You’ll want to create them in the same order as they’re numbered in your workflow. Match the slide numbers in Google Slides/PowerPoint to the slide numbers on your workflow.
Second: Create all the content on your slides. (Leave some room at the bottom for some links/buttons so the reader can make his/her next choice.) That means text boxes, images, whatever you need to tell your story!
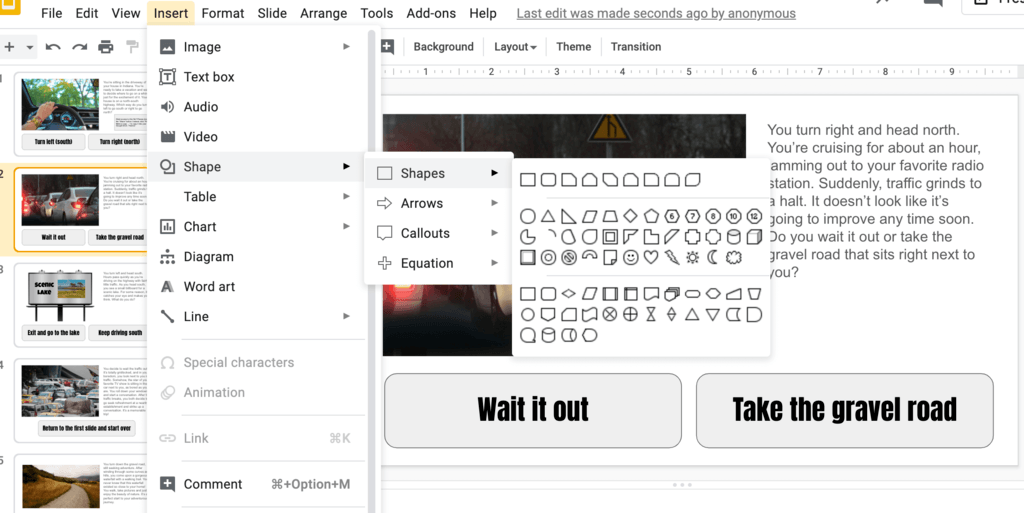
Third: Create your links/buttons so the reader can make choices. I did this by adding a shape (see below) and double-clicking it to add text.

Inserting a shape to make a button in your choice story. Click image for full-size.
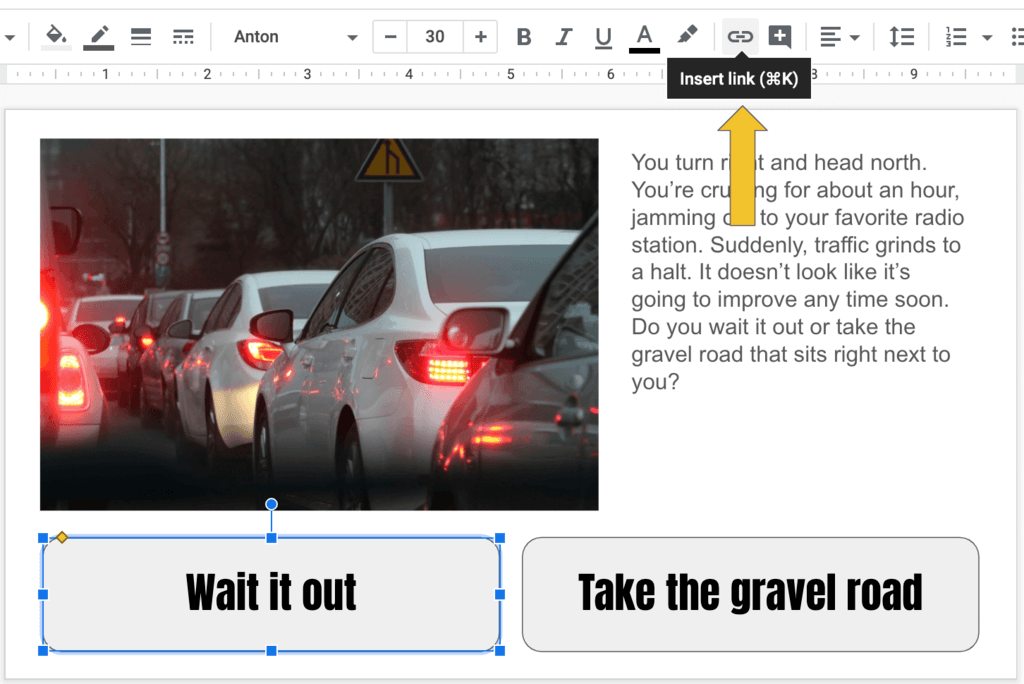
Fourth: Link your slides together. Start with this: If you’re using buttons made out of shapes (like I did above), you’ll want to click on the shape (be sure you aren’t highlighting the text). It’ll look like this (below).

Be sure to click on the image instead of highlighting text to create a link.
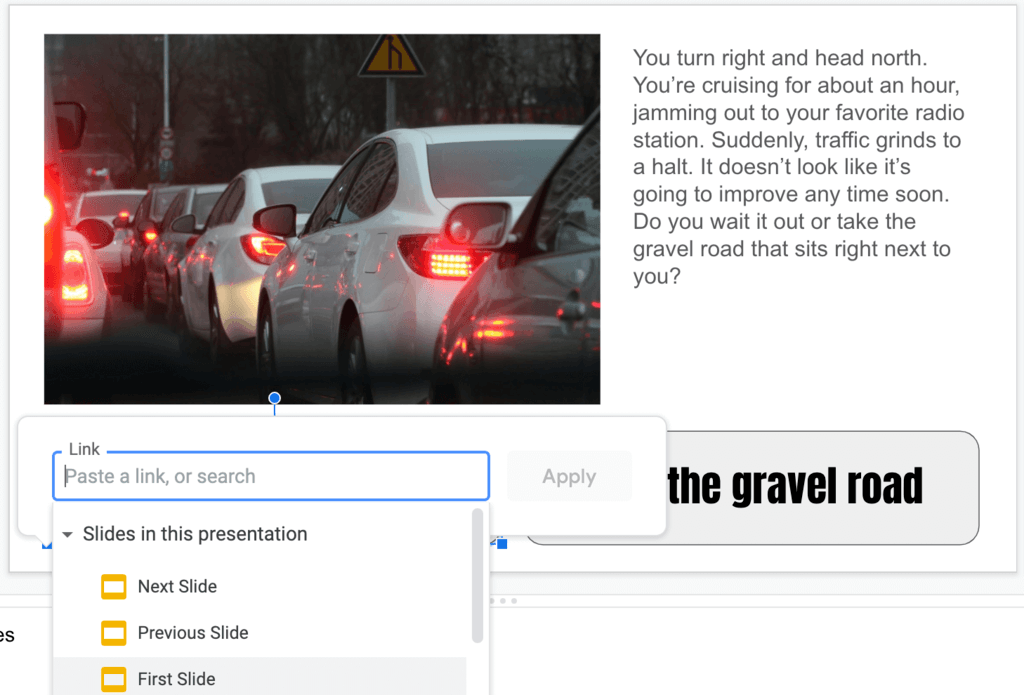
Then click the link button in the top toolbar. Instead of inserting a link to a webpage on the Internet, choose “Slides in this presentation”. Then, select the slide it should take you to.

After clicking the link button, choose “Slides in this presentation” to link to another slide in your slide deck.
Do this for all of the choices the reader gets to make. (These are the arrows in the workflow image above.)
Fifth: Create buttons on the slides with story endings that say “Click here to start over”. Click the button and create a link to the first slide.
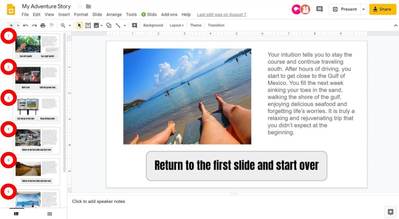
You’re done! Below is what my finished product looked like. (Click here to see the file, and please don’t request access to it through the share button … just File – Make a copy!)
How can we view each other’s choice stories?
Here are two ideas:
Idea 1: Share the links through Google Classroom. The easiest way might be to have students post their links as a class comment on the assignment. Two ways to get the link to share with others:
- BEST: Go to File > Publish to the web. Click the “Publish to the web” button. The in the “link” tab, copy the link. Share that link in Google Classroom. (This automatically puts the viewer into a version of present mode.)
- FASTEST: Click the “Share” button in the top right. Click “Get shareable link” and change it to “anyone with the link can view”. Share that link in Google Classroom.
Idea 2: Do a digital gallery walk. Students place their computers on their desks. They bring up their stories and click “Present”. They leave their computers on their desks and stand up. Then, they circulate around the room looking at each other’s devices. I describe how to do this in detail in this post: The Digital Gallery Walk: Collaboration on their feet
Tips to make choice stories even better
Tip 1: You can use a variety of structures to create your story just right! The structure I used above could be described as “pyramid with two choices per slide”. Other structures:
- “One ending per slide”: Each slide has a choice that advances the story and a choice that ends the story. This is fun for creating new endings to a story you’ve already read (i.e. literature, short stories, history, etc.). I wrote about this structure in depth in this post: One story, MANY endings: A fun, creative Google Slides activity
- “Pyramid with three choices per slide”: These get complicated quickly, but the reader gets lots of choices, which can be fun!
- “Adjoining choices”: Any of the structures above can have multiple slides that lead to the same outcome. You don’t have to have a unique slide for every choice. Example: You could have one “You didn’t make it” slide that all the possible stories could link to when they’re done. Another example: If two different paths take you to the same place, have both of them link to the same slide.
Tip 2: When you put your slides in present mode, when you click on anything other than your linked buttons, you’ll go to the next slide in the slide deck. This means: If a student accidentally clicks somewhere that’s not a button, he/she will not go to the next logical place.
Here’s how to avoid that:
- On each slide, insert a rectangle shape.
- Make it the same size (or bigger!) than the slide.
- Put it on top of all the content on your slide EXCEPT FOR the buttons. (You can do this between the second and third parts of step two above.)
- Change the background color of your shape to transparent.
- Click on your transparent rectangle and add a link to it. Link it to the slide it’s on. (Example: If it’s slide 4, create a link to slide 4.)
This way, if someone accidentally clicks on the wrong spot, they’ll stay on that same slide until they click a button to move forward. (If this part confuses you, just skip it! Your choice story will still work without it.)
Enjoy this fun activity where students put their creativity on display AND practice making good decisions!
For notifications of new Ditch That Textbook content and helpful links:
Are you looking for quality, meaningful professional learning that both equips and inspires teachers?
Matt provides in-person and virtual keynotes, workshops and breakout sessions that equip, inspire and encourage teachers to create change in their classrooms. Teachers leave with loads of resources. They participate. They laugh. They see tech use and teaching in a new light. Click the link below to contact us and learn how you can bring Matt to your school or district!
Is Matt presenting near you soon? Check out his upcoming live events!





This is such a cool idea. I am going to use this next week in my class. I remember reading these stories as a kid and they were wpic.
Is there any way to avoid the presentation auto-advancing when publishing to the web? That’s been my concern with creating a Choose Your Own Adventure in Slides.
[…] […]
[…] for more guidance on using this activity with your class? Check out Choice stories in Google Slides: How to + ideas for class and Learning math through story: Examples from one teacher’s classroom by Mandi […]
I fixed my own problem. I changed the link settings and was able to make a copy. Thanks.
Debra- Can you please share your fix with me! I’ve tried manipulating the URL, but have not been successful. Thanks!
Matt – I love the idea of the choose your own adventure story and will be providing it as a choice during distance learning. Is there a way you can make your sample not in presentation mode because I am not able to File – Make a copy. I would to show it to my students. Thanks
[…] Remember Choose Your Own Adventure books? Let students create stories or sequences where the reader chooses the next move! Click here to learn how! […]